Data Fetching Patterns in Single-Page Applications
- softscribble@gmail.com
- May 29, 2024
- Software development
- 0 Comments
Today, most applications can send hundreds of requests for a single page.
For example, my Twitter home page sends around 300 requests, and an Amazon
product details page sends around 600 requests. Some of them are for static
assets (JavaScript, CSS, font files, icons, etc.), but there are still
around 100 requests for async data fetching – either for timelines, friends,
or product recommendations, as well as analytics events. That’s quite a
lot.
The main reason a page may contain so many requests is to improve
performance and user experience, specifically to make the application feel
faster to the end users. The era of blank pages taking 5 seconds to load is
long gone. In modern web applications, users typically see a basic page with
style and other elements in less than a second, with additional pieces
loading progressively.
Take the Amazon product detail page as an example. The navigation and top
bar appear almost immediately, followed by the product images, brief, and
descriptions. Then, as you scroll, “Sponsored” content, ratings,
recommendations, view histories, and more appear.Often, a user only wants a
quick glance or to compare products (and check availability), making
sections like “Customers who bought this item also bought” less critical and
suitable for loading via separate requests.
Breaking down the content into smaller pieces and loading them in
parallel is an effective strategy, but it’s far from enough in large
applications. There are many other aspects to consider when it comes to
fetch data correctly and efficiently. Data fetching is a chellenging, not
only because the nature of async programming doesn’t fit our linear mindset,
and there are so many factors can cause a network call to fail, but also
there are too many not-obvious cases to consider under the hood (data
format, security, cache, token expiry, etc.).
In this article, I would like to discuss some common problems and
patterns you should consider when it comes to fetching data in your frontend
applications.
We’ll begin with the Asynchronous State Handler pattern, which decouples
data fetching from the UI, streamlining your application architecture. Next,
we’ll delve into Fallback Markup, enhancing the intuitiveness of your data
fetching logic. To accelerate the initial data loading process, we’ll
explore strategies for avoiding Request
Waterfall and implementing Parallel Data Fetching. Our discussion will then cover Code Splitting to defer
loading non-critical application parts and Prefetching data based on user
interactions to elevate the user experience.
I believe discussing these concepts through a straightforward example is
the best approach. I aim to start simply and then introduce more complexity
in a manageable way. I also plan to keep code snippets, particularly for
styling (I’m utilizing TailwindCSS for the UI, which can result in lengthy
snippets in a React component), to a minimum. For those interested in the
complete details, I’ve made them available in this
repository.
Advancements are also happening on the server side, with techniques like
Streaming Server-Side Rendering and Server Components gaining traction in
various frameworks. Additionally, a number of experimental methods are
emerging. However, these topics, while potentially just as crucial, might be
explored in a future article. For now, this discussion will concentrate
solely on front-end data fetching patterns.
It’s important to note that the techniques we’re covering are not
exclusive to React or any specific frontend framework or library. I’ve
chosen React for illustration purposes due to my extensive experience with
it in recent years. However, principles like Code Splitting,
Prefetching are
applicable across frameworks like Angular or Vue.js. The examples I’ll share
are common scenarios you might encounter in frontend development, regardless
of the framework you use.
That said, let’s dive into the example we’re going to use throughout the
article, a Profile screen of a Single-Page Application. It’s a typical
application you might have used before, or at least the scenario is typical.
We need to fetch data from server side and then at frontend to build the UI
dynamically with JavaScript.
Introducing the application
To begin with, on Profile we’ll show the user’s brief (including
name, avatar, and a short description), and then we also want to show
their connections (similar to followers on Twitter or LinkedIn
connections). We’ll need to fetch user and their connections data from
remote service, and then assembling these data with UI on the screen.
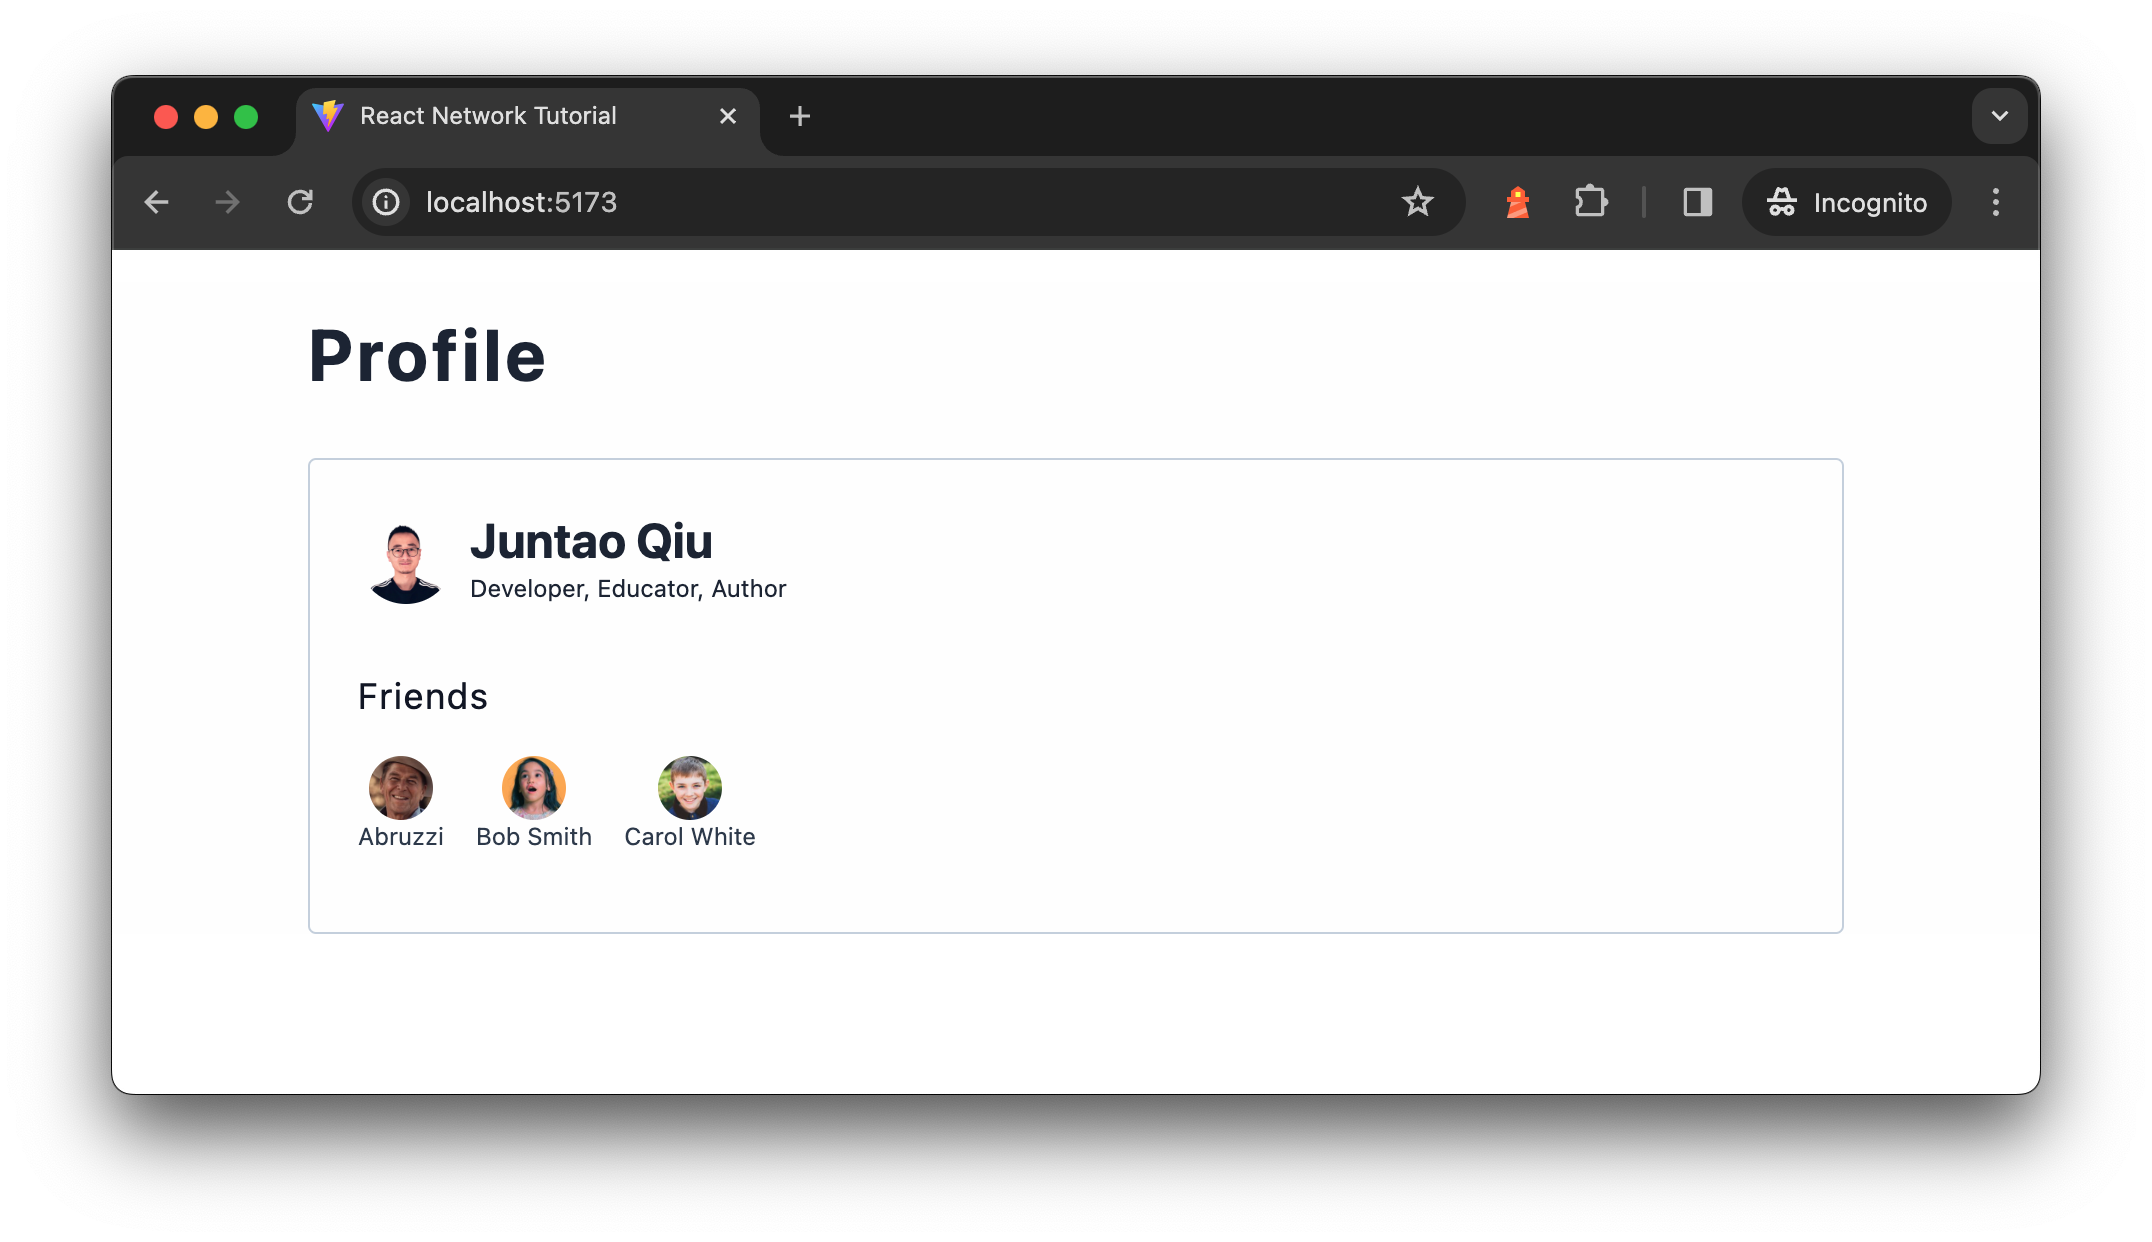
Figure 1: Profile screen
The data are from two separate API calls, the user brief API
/users/<id> returns user brief for a given user id, which is a simple
object described as follows:
{
  "id": "u1",
  "name": "Juntao Qiu",
  "bio": "Developer, Educator, Author",
  "interests": [
    "Technology",
    "Outdoors",
    "Travel"
  ]
}
And the friend API /users/<id>/friends endpoint returns a list of
friends for a given user, each list item in the response is the same as
the above user data. The reason we have two endpoints instead of returning
a friends section of the user API is that there are cases where one
could have too many friends (say 1,000), but most people don’t have many.
This in-balance data structure can be pretty tricky, especially when we
need to paginate. The point here is that there are cases we need to deal
with multiple network requests.
A brief introduction to relevant React concepts
As this article leverages React to illustrate various patterns, I do
not assume you know much about React. Rather than expecting you to spend a lot
of time trying to find the right parts in the React documentation, I will
briefly introduce those concepts we’re going to utilize throughout this
article. If you already understand what React components are, and the
use of the
useState and useEffect hooks, you may
use this link to skip ahead to the next
section.
For those seeking a more thorough tutorial, the new React documentation is an excellent
resource.
What is a React Component?
In React, components are the fundamental building blocks. To put it
simply, a React component is a function that returns a piece of UI,
which can be as straightforward as a fragment of HTML. Consider the
creation of a component that renders a navigation bar:
import React from 'react';

function Navigation() {
  return (
    <nav>
      <ol>
        <li>Home</li>
        <li>Blogs</li>
        <li>Books</li>
      </ol>
    </nav>
  );
}
At first glance, the mixture of JavaScript with HTML tags might seem
strange (it’s called JSX, a syntax extension to JavaScript. For those
using TypeScript, a similar syntax called TSX is used). To make this
code functional, a compiler is required to translate the JSX into valid
JavaScript code. After being compiled by Babel,
the code would roughly translate to the following:
function Navigation() {
  return React.createElement(
    "nav",
    null,
    React.createElement(
      "ol",
      null,
      React.createElement("li", null, "Home"),
      React.createElement("li", null, "Blogs"),
      React.createElement("li", null, "Books")
    )
  );
}
Note here the translated code has a function called
React.createElement, which is a foundational function in
React for creating elements. JSX written in React components is compiled
down to React.createElement calls behind the scenes.
The basic syntax of React.createElement is:
React.createElement(type, [props], [...children])
type: A string (e.g., ‘div’, ‘span’) indicating the type of
DOM node to create, or a React component (class or functional) for
more sophisticated structures.props: An object containing properties passed to the
element or component, including event handlers, styles, and attributes
likeclassNameandid.children: These optional arguments can be additional
React.createElementcalls, strings, numbers, or any mix
thereof, representing the element’s children.
For instance, a simple element can be created with
React.createElement as follows:
React.createElement('div', { className: 'greeting' }, 'Hello, world!');
This is analogous to the JSX version:
<div className="greeting">Hello, world!</div>
Beneath the surface, React invokes the native DOM API (e.g.,
document.createElement("ol")) to generate DOM elements as necessary.
You can then assemble your custom components into a tree, similar to
HTML code:
import React from 'react';
import Navigation from './Navigation.tsx';
import Content from './Content.tsx';
import Sidebar from './Sidebar.tsx';
import ProductList from './ProductList.tsx';

function App() {
  return <Page />;
}

function Page() {
  return <Container>
    <Navigation />
    <Content>
      <Sidebar />
      <ProductList />
    </Content>
    <Footer />
  </Container>;
}
Ultimately, your application requires a root node to mount to, at
which point React assumes control and manages subsequent renders and
re-renders:
import ReactDOM from "react-dom/client";
import App from "./App.tsx";

const root = ReactDOM.createRoot(document.getElementById('root'));
root.render(<App />);
Generating Dynamic Content with JSX
The initial example demonstrates a straightforward use case, but
let’s explore how we can create content dynamically. For instance, how
can we generate a list of data dynamically? In React, as illustrated
earlier, a component is fundamentally a function, enabling us to pass
parameters to it.
import React from 'react';

function Navigation({ nav }) {
  return (
    <nav>
      <ol>
        {nav.map(item => <li key={item}>{item}</li>)}
      </ol>
    </nav>
  );
}
In this modified Navigation component, we anticipate the
parameter to be an array of strings. We utilize the map
function to iterate over each item, transforming them into
<li> elements. The curly braces {} signify
that the enclosed JavaScript expression should be evaluated and
rendered. For those curious about the compiled version of this dynamic
content handling:
function Navigation(props) {
  var nav = props.nav;

  return React.createElement(
    "nav",
    null,
    React.createElement(
      "ol",
      null,
      nav.map(function(item) {
        return React.createElement("li", { key: item }, item);
      })
    )
  );
}
Instead of invoking Navigation as a regular function,
employing JSX syntax renders the component invocation more akin to
writing markup, enhancing readability:
// Instead of this
Navigation(["Home", "Blogs", "Books"])

// We do this
<Navigation nav={["Home", "Blogs", "Books"]} />
Components in React can receive diverse data, known as props, to
modify their behavior, much like passing arguments into a function (the
distinction lies in using JSX syntax, making the code more familiar and
readable to those with HTML knowledge, which aligns well with the skill
set of most frontend developers).
import React from 'react';
import Checkbox from './Checkbox';
import BookList from './BookList';

function App() {
  let showNewOnly = false; // This flag's value is typically set based on specific logic.

  const filteredBooks = showNewOnly
    ? booksData.filter(book => book.isNewPublished)
    : booksData;

  return (
    <div>
      <Checkbox checked={showNewOnly}>
        Show New Published Books Only
      </Checkbox>
      <BookList books={filteredBooks} />
    </div>
  );
}
In this illustrative code snippet (non-functional but intended to
demonstrate the concept), we manipulate the BookList
component’s displayed content by passing it an array of books. Depending
on the showNewOnly flag, this array is either all available
books or only those that are newly published, showcasing how props can
be used to dynamically adjust component output.
Managing Internal State Between Renders: useState
Building user interfaces (UI) often transcends the generation of
static HTML. Components frequently need to “remember” certain states and
respond to user interactions dynamically. For instance, when a user
clicks an “Add” button in a Product component, it’s necessary to update
the ShoppingCart component to reflect both the total price and the
updated item list.
In the previous code snippet, attempting to set the
showNewOnly variable to true within an event
handler does not achieve the desired effect:
function App () {
  let showNewOnly = false;

  const handleCheckboxChange = () => {
    showNewOnly = true; // this doesn't work
  };

  const filteredBooks = showNewOnly
    ? booksData.filter(book => book.isNewPublished)
    : booksData;

  return (
    <div>
      <Checkbox checked={showNewOnly} onChange={handleCheckboxChange}>
        Show New Published Books Only
      </Checkbox>

      <BookList books={filteredBooks}/>
    </div>
  );
};
This approach falls short because local variables inside a function
component do not persist between renders. When React re-renders this
component, it does so from scratch, disregarding any changes made to
local variables since these do not trigger re-renders. React remains
unaware of the need to update the component to reflect new data.
This limitation underscores the necessity for React’s
state. Specifically, functional components leverage the
useState hook to remember states across renders. Revisiting
the App example, we can effectively remember the
showNewOnly state as follows:
import React, { useState } from 'react';
import Checkbox from './Checkbox';
import BookList from './BookList';

function App () {
  const [showNewOnly, setShowNewOnly] = useState(false);

  const handleCheckboxChange = () => {
    setShowNewOnly(!showNewOnly);
  };

  const filteredBooks = showNewOnly
    ? booksData.filter(book => book.isNewPublished)
    : booksData;

  return (
    <div>
      <Checkbox checked={showNewOnly} onChange={handleCheckboxChange}>
        Show New Published Books Only
      </Checkbox>

      <BookList books={filteredBooks}/>
    </div>
  );
};
The useState hook is a cornerstone of React’s Hooks system,
introduced to enable functional components to manage internal state. It
introduces state to functional components, encapsulated by the following
syntax:
const [state, setState] = useState(initialState);
initialState: This argument is the initial
value of the state variable. It can be a simple value like a number,
string, boolean, or a more complex object or array. The
initialStateis only used during the first render to
initialize the state.- Return Value:
useStatereturns an array with
two elements. The first element is the current state value, and the
second element is a function that allows updating this value. By using
array destructuring, we assign names to these returned items,
typicallystateandsetState, though you can
choose any valid variable names. state: Represents the current value of the
state. It’s the value that will be used in the component’s UI and
logic.setState: A function to update the state. This function
accepts a new state value or a function that produces a new state based
on the previous state. When called, it schedules an update to the
component’s state and triggers a re-render to reflect the changes.
React treats state as a snapshot; updating it doesn’t alter the
existing state variable but instead triggers a re-render. During this
re-render, React acknowledges the updated state, ensuring the
BookList component receives the correct data, thereby
reflecting the updated book list to the user. This snapshot-like
behavior of state facilitates the dynamic and responsive nature of React
components, enabling them to react intuitively to user interactions and
other changes.
Managing Side Effects: useEffect
Before diving deeper into our discussion, it’s crucial to address the
concept of side effects. Side effects are operations that interact with
the outside world from the React ecosystem. Common examples include
fetching data from a remote server or dynamically manipulating the DOM,
such as changing the page title.
React is primarily concerned with rendering data to the DOM and does
not inherently handle data fetching or direct DOM manipulation. To
facilitate these side effects, React provides the useEffect
hook. This hook allows the execution of side effects after React has
completed its rendering process. If these side effects result in data
changes, React schedules a re-render to reflect these updates.
The useEffect Hook accepts two arguments:
- A function containing the side effect logic.
- An optional dependency array specifying when the side effect should be
re-invoked.
Omitting the second argument causes the side effect to run after
every render. Providing an empty array [] signifies that your effect
doesn’t depend on any values from props or state, thus not needing to
re-run. Including specific values in the array means the side effect
only re-executes if those values change.
When dealing with asynchronous data fetching, the workflow within
useEffect entails initiating a network request. Once the data is
retrieved, it is captured via the useState hook, updating the
component’s internal state and preserving the fetched data across
renders. React, recognizing the state update, undertakes another render
cycle to incorporate the new data.
Here’s a practical example about data fetching and state
management:
import { useEffect, useState } from "react";

type User = {
  id: string;
  name: string;
};

const UserSection = ({ id }) => {
  const [user, setUser] = useState<User | undefined>();

  useEffect(() => {
    const fetchUser = async () => {
      const response = await fetch(`/api/users/${id}`);
      const jsonData = await response.json();
      setUser(jsonData);
    };

    fetchUser();
  }, tag:martinfowler.com,2024-05-29:Prefetching-in-Single-Page-Applications);

  return <div>
    <h2>{user?.name}</h2>
  </div>;
};
In the code snippet above, within useEffect, an
asynchronous function fetchUser is defined and then
immediately invoked. This pattern is necessary because
useEffect does not directly support async functions as its
callback. The async function is defined to use await for
the fetch operation, ensuring that the code execution waits for the
response and then processes the JSON data. Once the data is available,
it updates the component’s state via setUser.
The dependency array tag:martinfowler.com,2024-05-29:Prefetching-in-Single-Page-Applications at the end of the
useEffect call ensures that the effect runs again only if
id changes, which prevents unnecessary network requests on
every render and fetches new user data when the id prop
updates.
This approach to handling asynchronous data fetching within
useEffect is a standard practice in React development, offering a
structured and efficient way to integrate async operations into the
React component lifecycle.
In addition, in practical applications, managing different states
such as loading, error, and data presentation is essential too (we’ll
see it how it works in the following section). For example, consider
implementing status indicators within a User component to reflect
loading, error, or data states, enhancing the user experience by
providing feedback during data fetching operations.

Figure 2: Different statuses of a
component
This overview offers just a quick glimpse into the concepts utilized
throughout this article. For a deeper dive into additional concepts and
patterns, I recommend exploring the new React
documentation or consulting other online resources.
With this foundation, you should now be equipped to join me as we delve
into the data fetching patterns discussed herein.
Implement the Profile component
Let’s create the Profile component to make a request and
render the result. In typical React applications, this data fetching is
handled inside a useEffect block. Here’s an example of how
this might be implemented:
import { useEffect, useState } from "react";

const Profile = ({ id }: { id: string }) => {
  const [user, setUser] = useState<User | undefined>();

  useEffect(() => {
    const fetchUser = async () => {
      const response = await fetch(`/api/users/${id}`);
      const jsonData = await response.json();
      setUser(jsonData);
    };

    fetchUser();
  }, tag:martinfowler.com,2024-05-29:Prefetching-in-Single-Page-Applications);

  return (
    <UserBrief user={user} />
  );
};
This initial approach assumes network requests complete
instantaneously, which is often not the case. Real-world scenarios require
handling varying network conditions, including delays and failures. To
manage these effectively, we incorporate loading and error states into our
component. This addition allows us to provide feedback to the user during
data fetching, such as displaying a loading indicator or a skeleton screen
if the data is delayed, and handling errors when they occur.
Here’s how the enhanced component looks with added loading and error
management:
import { useEffect, useState } from "react";
import { get } from "../utils.ts";

import type { User } from "../types.ts";

const Profile = ({ id }: { id: string }) => {
  const [loading, setLoading] = useState<boolean>(false);
  const [error, setError] = useState<Error | undefined>();
  const [user, setUser] = useState<User | undefined>();

  useEffect(() => {
    const fetchUser = async () => {
      try {
        setLoading(true);
        const data = await get<User>(`/users/${id}`);
        setUser(data);
      } catch (e) {
        setError(e as Error);
      } finally {
        setLoading(false);
      }
    };

    fetchUser();
  }, tag:martinfowler.com,2024-05-29:Prefetching-in-Single-Page-Applications);

  if (loading || !user) {
    return <div>Loading...</div>;
  }

  return (
    <>
      {user && <UserBrief user={user} />}
    </>
  );
};
Now in Profile component, we initiate states for loading,
errors, and user data with useState. Using
useEffect, we fetch user data based on id,
toggling loading status and handling errors accordingly. Upon successful
data retrieval, we update the user state, else display a loading
indicator.
The get function, as demonstrated below, simplifies
fetching data from a specific endpoint by appending the endpoint to a
predefined base URL. It checks the response’s success status and either
returns the parsed JSON data or throws an error for unsuccessful requests,
streamlining error handling and data retrieval in our application. Note
it’s pure TypeScript code and can be used in other non-React parts of the
application.
const baseurl = "https://icodeit.com.au/api/v2";

async function get<T>(url: string): Promise<T> {
  const response = await fetch(`${baseurl}${url}`);

  if (!response.ok) {
    throw new Error("Network response was not ok");
  }

  return await response.json() as Promise<T>;
}
React will try to render the component initially, but as the data
user isn’t available, it returns “loading…” in a
div. Then the useEffect is invoked, and the
request is kicked off. Once at some point, the response returns, React
re-renders the Profile component with user
fulfilled, so you can now see the user section with name, avatar, and
title.
If we visualize the timeline of the above code, you will see
the following sequence. The browser firstly downloads the HTML page, and
then when it encounters script tags and style tags, it might stop and
download these files, and then parse them to form the final page. Note
that this is a relatively complicated process, and I’m oversimplifying
here, but the basic idea of the sequence is correct.
Figure 3: Fetching user
data
So React can start to render only when the JS are parsed and executed,
and then it finds the useEffect for data fetching; it has to wait until
the data is available for a re-render.
Now in the browser, we can see a “loading…” when the application
starts, and then after a few seconds (we can simulate such case by add
some delay in the API endpoints) the user brief section shows up when data
is loaded.

Figure 4: User brief component
This code structure (in useEffect to trigger request, and update states
like loading and error correspondingly) is
widely used across React codebases. In applications of regular size, it’s
common to find numerous instances of such same data-fetching logic
dispersed throughout various components.
Asynchronous State Handler
Wrap asynchronous queries with meta-queries for the state of the
query.
Remote calls can be slow, and it’s essential not to let the UI freeze
while these calls are being made. Therefore, we handle them asynchronously
and use indicators to show that a process is underway, which makes the
user experience better – knowing that something is happening.
Additionally, remote calls might fail due to connection issues,
requiring clear communication of these failures to the user. Therefore,
it’s best to encapsulate each remote call within a handler module that
manages results, progress updates, and errors. This module allows the UI
to access metadata about the status of the call, enabling it to display
alternative information or options if the expected results fail to
materialize.
A simple implementation could be a function getAsyncStates that
returns these metadata, it takes a URL as its parameter and returns an
object containing information essential for managing asynchronous
operations. This setup allows us to appropriately respond to different
states of a network request, whether it’s in progress, successfully
resolved, or has encountered an error.
const { loading, error, data } = getAsyncStates(url);

if (loading) {
  // Display a loading spinner
}

if (error) {
  // Display an error message
}

// Proceed to render using the data
The assumption here is that getAsyncStates initiates the
network request automatically upon being called. However, this might not
always align with the caller’s needs. To offer more control, we can also
expose a fetch function within the returned object, allowing
the initiation of the request at a more appropriate time, according to the
caller’s discretion. Additionally, a refetch function could
be provided to enable the caller to re-initiate the request as needed,
such as after an error or when updated data is required. The
fetch and refetch functions can be identical in
implementation, or refetch might include logic to check for
cached results and only re-fetch data if necessary.
const { loading, error, data, fetch, refetch } = getAsyncStates(url);

const onInit = () => {
  fetch();
};

const onRefreshClicked = () => {
  refetch();
};

if (loading) {
  // Display a loading spinner
}

if (error) {
  // Display an error message
}

// Proceed to render using the data
This pattern provides a versatile approach to handling asynchronous
requests, giving developers the flexibility to trigger data fetching
explicitly and manage the UI’s response to loading, error, and success
states effectively. By decoupling the fetching logic from its initiation,
applications can adapt more dynamically to user interactions and other
runtime conditions, enhancing the user experience and application
reliability.
Implementing Asynchronous State Handler in React with hooks
The pattern can be implemented in different frontend libraries. For
instance, we could distill this approach into a custom Hook in a React
application for the Profile component:
import { useEffect, useState } from "react";
import { get } from "../utils.ts";

const useUser = (id: string) => {
  const [loading, setLoading] = useState<boolean>(false);
  const [error, setError] = useState<Error | undefined>();
  const [user, setUser] = useState<User | undefined>();

  useEffect(() => {
    const fetchUser = async () => {
      try {
        setLoading(true);
        const data = await get<User>(`/users/${id}`);
        setUser(data);
      } catch (e) {
        setError(e as Error);
      } finally {
        setLoading(false);
      }
    };

    fetchUser();
  }, tag:martinfowler.com,2024-05-29:Prefetching-in-Single-Page-Applications);

  return {
    loading,
    error,
    user,
  };
};
Please note that in the custom Hook, we don’t have any JSX code –
meaning it’s totally UI free but sharable stateful logic. And the
useUser launch data automatically when called. Within the Profile
component, leveraging the useUser Hook simplifies its logic:
import { useUser } from './useUser.ts';
import UserBrief from './UserBrief.tsx';

const Profile = ({ id }: { id: string }) => {
  const { loading, error, user } = useUser(id);

  if (loading || !user) {
    return <div>Loading...</div>;
  }

  if (error) {
    return <div>Something went wrong...</div>;
  }

  return (
    <>
      {user && <UserBrief user={user} />}
    </>
  );
};
Generalizing Parameter Usage
In most applications, fetching different types of data—from user
details on a homepage to product lists in search results and
recommendations beneath them—is a common requirement. Writing separate
fetch functions for each type of data can be tedious and difficult to
maintain. A better approach is to abstract this functionality into a
generic, reusable hook that can handle various data types
efficiently.
Consider treating remote API endpoints as services, and use a generic
useService hook that accepts a URL as a parameter while managing all
the metadata associated with an asynchronous request:
import { get } from "../utils.ts";

function useService<T>(url: string) {
  const [loading, setLoading] = useState<boolean>(false);
  const [error, setError] = useState<Error | undefined>();
  const [data, setData] = useState<T | undefined>();

  const fetch = async () => {
    try {
      setLoading(true);
      const data = await get<T>(url);
      setData(data);
    } catch (e) {
      setError(e as Error);
    } finally {
      setLoading(false);
    }
  };

  return {
    loading,
    error,
    data,
    fetch,
  };
}
This hook abstracts the data fetching process, making it easier to
integrate into any component that needs to retrieve data from a remote
source. It also centralizes common error handling scenarios, such as
treating specific errors differently:
import { useService } from './useService.ts';

const {
  loading,
  error,
  data: user,
  fetch: fetchUser,
} = useService(`/users/${id}`);
By using useService, we can simplify how components fetch and handle
data, making the codebase cleaner and more maintainable.
Variation of the pattern
A variation of the useUser would be expose the
fetchUsers function, and it does not trigger the data
fetching itself:
import { useState } from "react";

const useUser = (id: string) => {
  // define the states

  const fetchUser = async () => {
    try {
      setLoading(true);
      const data = await get<User>(`/users/${id}`);
      setUser(data);
    } catch (e) {
      setError(e as Error);
    } finally {
      setLoading(false);
    }
  };

  return {
    loading,
    error,
    user,
    fetchUser,
  };
};
And then on the calling site, Profile component use
useEffect to fetch the data and render different
states.
const Profile = ({ id }: { id: string }) => {
  const { loading, error, user, fetchUser } = useUser(id);

  useEffect(() => {
    fetchUser();
  }, []);

  // render correspondingly
};
The advantage of this division is the ability to reuse these stateful
logics across different components. For instance, another component
needing the same data (a user API call with a user ID) can simply import
the useUser Hook and utilize its states. Different UI
components might choose to interact with these states in various ways,
perhaps using alternative loading indicators (a smaller spinner that
fits to the calling component) or error messages, yet the fundamental
logic of fetching data remains consistent and shared.
When to use it
Separating data fetching logic from UI components can sometimes
introduce unnecessary complexity, particularly in smaller applications.
Keeping this logic integrated within the component, similar to the
css-in-js approach, simplifies navigation and is easier for some
developers to manage. In my article, Modularizing
React Applications with Established UI Patterns, I explored
various levels of complexity in application structures. For applications
that are limited in scope — with just a few pages and several data
fetching operations — it’s often practical and also recommended to
maintain data fetching within the UI components.
However, as your application scales and the development team grows,
this strategy may lead to inefficiencies. Deep component trees can slow
down your application (we will see examples as well as how to address
them in the following sections) and generate redundant boilerplate code.
Introducing an Asynchronous State Handler can mitigate these issues by
decoupling data fetching from UI rendering, enhancing both performance
and maintainability.
It’s crucial to balance simplicity with structured approaches as your
project evolves. This ensures your development practices remain
effective and responsive to the application’s needs, maintaining optimal
performance and developer efficiency regardless of the project
scale.
Implement the Friends list
Now let’s have a look at the second section of the Profile – the friend
list. We can create a separate component Friends and fetch data in it
(by using a useService custom hook we defined above), and the logic is
pretty similar to what we see above in the Profile component.
const Friends = ({ id }: { id: string }) => {
  const { loading, error, data: friends } = useService(`/users/${id}/friends`);

  // loading & error handling...

  return (
    <div>
      <h2>Friends</h2>
      <div>
        {friends.map((user) => (
        // render user list
        ))}
      </div>
    </div>
  );
};
And then in the Profile component, we can use Friends as a regular
component, and pass in id as a prop:
const Profile = ({ id }: { id: string }) => {
  //...

  return (
    <>
      {user && <UserBrief user={user} />}
      <Friends id={id} />
    </>
  );
};
The code works fine, and it looks pretty clean and readable,
UserBrief renders a user object passed in, while
Friends manage its own data fetching and rendering logic
altogether. If we visualize the component tree, it would be something like
this:
Figure 5: Component structure
Both the Profile and Friends have logic for
data fetching, loading checks, and error handling. Since there are two
separate data fetching calls, and if we look at the request timeline, we
will notice something interesting.
Figure 6: Request waterfall
The Friends component won’t initiate data fetching until the user
state is set. This is referred to as the Fetch-On-Render approach,
where the initial rendering is paused because the data isn’t available,
requiring React to wait for the data to be retrieved from the server
side.
This waiting period is somewhat inefficient, considering that while
React’s rendering process only takes a few milliseconds, data fetching can
take significantly longer, often seconds. As a result, the Friends
component spends most of its time idle, waiting for data. This scenario
leads to a common challenge known as the Request Waterfall, a frequent
occurrence in frontend applications that involve multiple data fetching
operations.
Parallel Data Fetching
Run remote data fetches in parallel to minimize wait time
Imagine when we build a larger application that a component that
requires data can be deeply nested in the component tree, to make the
matter worse these components are developed by different teams, it’s hard
to see whom we’re blocking.
Figure 7: Request waterfall
Request Waterfalls can degrade user
experience, something we aim to avoid. Analyzing the data, we see that the
user API and friends API are independent and can be fetched in parallel.
Initiating these parallel requests becomes critical for application
performance.
One approach is to centralize data fetching at a higher level, near the
root. Early in the application’s lifecycle, we start all data fetches
simultaneously. Components dependent on this data wait only for the
slowest request, typically resulting in faster overall load times.
We could use the Promise API Promise.all to send
both requests for the user’s basic information and their friends list.
Promise.all is a JavaScript method that allows for the
concurrent execution of multiple promises. It takes an array of promises
as input and returns a single Promise that resolves when all of the input
promises have resolved, providing their results as an array. If any of the
promises fail, Promise.all immediately rejects with the
reason of the first promise that rejects.
For instance, at the application’s root, we can define a comprehensive
data model:
type ProfileState = {
  user: User;
  friends: User[];
};

const getProfileData = async (id: string) =>
  Promise.all([
    get<User>(`/users/${id}`),
    get<User[]>(`/users/${id}/friends`),
  ]);

const App = () => {
  // fetch data at the very begining of the application launch
  const onInit = () => {
    const [user, friends] = await getProfileData(id);
  }

  // render the sub tree correspondingly
}
Implementing Parallel Data Fetching in React
Upon application launch, data fetching begins, abstracting the
fetching process from subcomponents. For example, in Profile component,
both UserBrief and Friends are presentational components that react to
the passed data. This way we could develop these component separately
(adding styles for different states, for example). These presentational
components normally are easy to test and modify as we have separate the
data fetching and rendering.
We can define a custom hook useProfileData that facilitates
parallel fetching of data related to a user and their friends by using
Promise.all. This method allows simultaneous requests, optimizing the
loading process and structuring the data into a predefined format known
as ProfileData.
Here’s a breakdown of the hook implementation:
import { useCallback, useEffect, useState } from "react";

type ProfileData = {
  user: User;
  friends: User[];
};

const useProfileData = (id: string) => {
  const [loading, setLoading] = useState<boolean>(false);
  const [error, setError] = useState<Error | undefined>(undefined);
  const [profileState, setProfileState] = useState<ProfileData>();

  const fetchProfileState = useCallback(async () => {
    try {
      setLoading(true);
      const [user, friends] = await Promise.all([
        get<User>(`/users/${id}`),
        get<User[]>(`/users/${id}/friends`),
      ]);
      setProfileState({ user, friends });
    } catch (e) {
      setError(e as Error);
    } finally {
      setLoading(false);
    }
  }, tag:martinfowler.com,2024-05-29:Prefetching-in-Single-Page-Applications);

  return {
    loading,
    error,
    profileState,
    fetchProfileState,
  };

};
This hook provides the Profile component with the
necessary data states (loading, error,
profileState) along with a fetchProfileState
function, enabling the component to initiate the fetch operation as
needed. Note here we use useCallback hook to wrap the async
function for data fetching. The useCallback hook in React is used to
memoize functions, ensuring that the same function instance is
maintained across component re-renders unless its dependencies change.
Similar to the useEffect, it accepts the function and a dependency
array, the function will only be recreated if any of these dependencies
change, thereby avoiding unintended behavior in React’s rendering
cycle.
The Profile component uses this hook and controls the data fetching
timing via useEffect:
const Profile = ({ id }: { id: string }) => {
  const { loading, error, profileState, fetchProfileState } = useProfileData(id);

  useEffect(() => {
    fetchProfileState();
  }, [fetchProfileState]);

  if (loading) {
    return <div>Loading...</div>;
  }

  if (error) {
    return <div>Something went wrong...</div>;
  }

  return (
    <>
      {profileState && (
        <>
          <UserBrief user={profileState.user} />
          <Friends users={profileState.friends} />
        </>
      )}
    </>
  );
};
This approach is also known as Fetch-Then-Render, suggesting that the aim
is to initiate requests as early as possible during page load.
Subsequently, the fetched data is utilized to drive React’s rendering of
the application, bypassing the need to manage data fetching amidst the
rendering process. This strategy simplifies the rendering process,
making the code easier to test and modify.
And the component structure, if visualized, would be like the
following illustration
Figure 8: Component structure after refactoring
And the timeline is much shorter than the previous one as we send two
requests in parallel. The Friends component can render in a few
milliseconds as when it starts to render, the data is already ready and
passed in.
Figure 9: Parallel requests
Note that the longest wait time depends on the slowest network
request, which is much faster than the sequential ones. And if we could
send as many of these independent requests at the same time at an upper
level of the component tree, a better user experience can be
expected.
As applications expand, managing an increasing number of requests at
root level becomes challenging. This is particularly true for components
distant from the root, where passing down data becomes cumbersome. One
approach is to store all data globally, accessible via functions (like
Redux or the React Context API), avoiding deep prop drilling.
When to use it
Running queries in parallel is useful whenever such queries may be
slow and don’t significantly interfere with each others’ performance.
This is usually the case with remote queries. Even if the remote
machine’s I/O and computation is fast, there’s always potential latency
issues in the remote calls. The main disadvantage for parallel queries
is setting them up with some kind of asynchronous mechanism, which may be
difficult in some language environments.
The main reason to not use parallel data fetching is when we don’t
know what data needs to be fetched until we’ve already fetched some
data. Certain scenarios require sequential data fetching due to
dependencies between requests. For instance, consider a scenario on a
Profile page where generating a personalized recommendation feed
depends on first acquiring the user’s interests from a user API.
Here’s an example response from the user API that includes
interests:
{
  "id": "u1",
  "name": "Juntao Qiu",
  "bio": "Developer, Educator, Author",
  "interests": [
    "Technology",
    "Outdoors",
    "Travel"
  ]
}
In such cases, the recommendation feed can only be fetched after
receiving the user’s interests from the initial API call. This
sequential dependency prevents us from utilizing parallel fetching, as
the second request relies on data obtained from the first.
Given these constraints, it becomes important to discuss alternative
strategies in asynchronous data management. One such strategy is
Fallback Markup. This approach allows developers to specify what
data is needed and how it should be fetched in a way that clearly
defines dependencies, making it easier to manage complex data
relationships in an application.
Another example of when arallel Data Fetching is not applicable is
that in scenarios involving user interactions that require real-time
data validation.
Consider the case of a list where each item has an “Approve” context
menu. When a user clicks on the “Approve” option for an item, a dropdown
menu appears offering choices to either “Approve” or “Reject.” If this
item’s approval status could be changed by another admin concurrently,
then the menu options must reflect the most current state to avoid
conflicting actions.
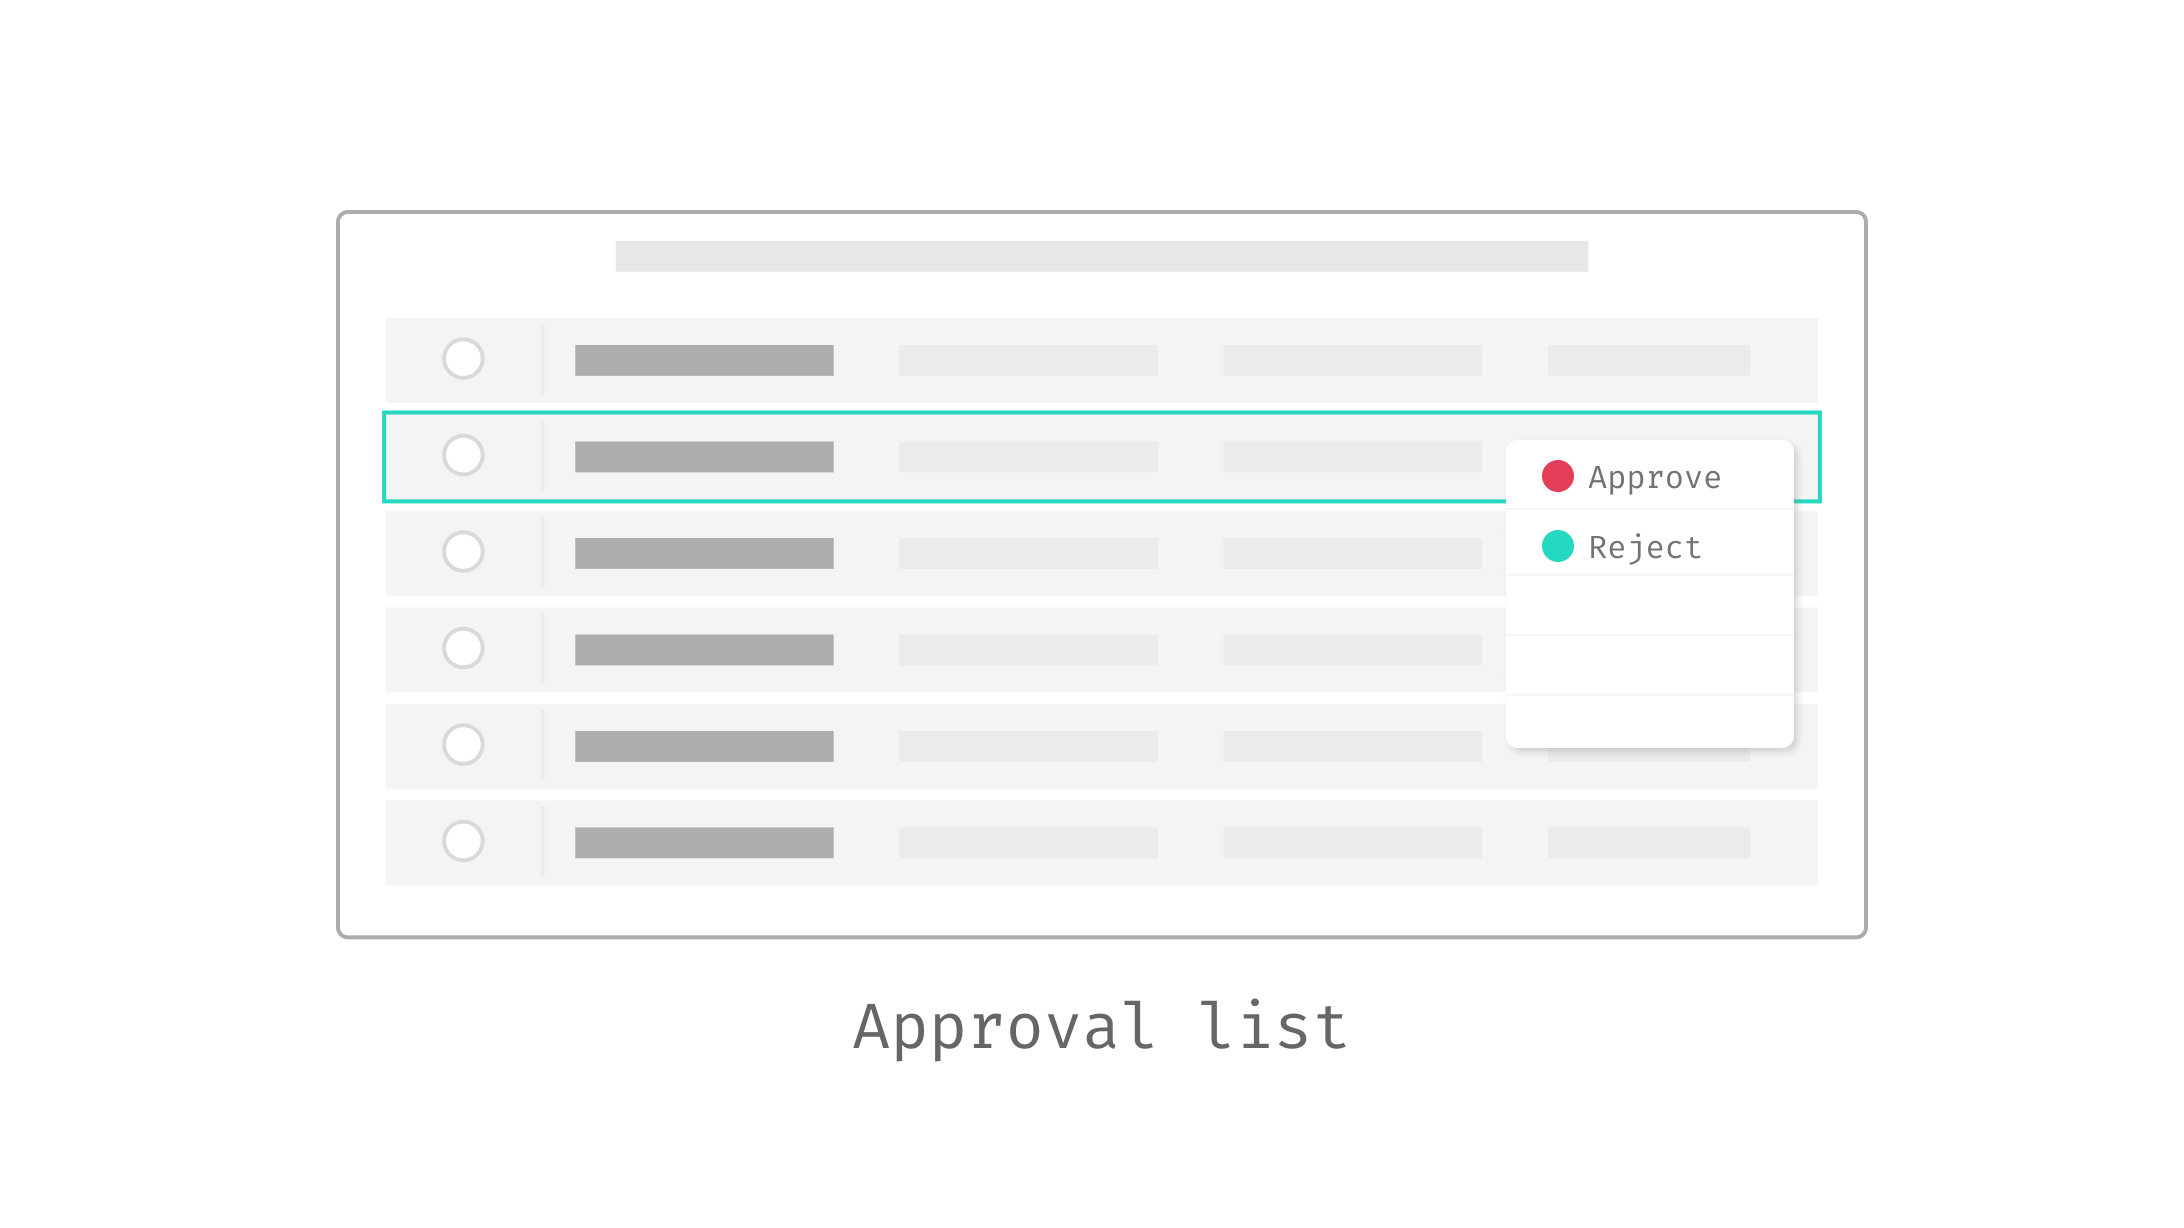
Figure 10: The approval list that require in-time
states
To handle this, a service call is initiated each time the context
menu is activated. This service fetches the latest status of the item,
ensuring that the dropdown is constructed with the most accurate and
current options available at that moment. As a result, these requests
cannot be made in parallel with other data-fetching activities since the
dropdown’s contents depend entirely on the real-time status fetched from
the server.
Fallback Markup
Specify fallback displays in the page markup
This pattern leverages abstractions provided by frameworks or libraries
to handle the data retrieval process, including managing states like
loading, success, and error, behind the scenes. It allows developers to
focus on the structure and presentation of data in their applications,
promoting cleaner and more maintainable code.
Let’s take another look at the Friends component in the above
section. It has to maintain three different states and register the
callback in useEffect, setting the flag correctly at the right time,
arrange the different UI for different states:
const Friends = ({ id }: { id: string }) => {
  //...
  const {
    loading,
    error,
    data: friends,
    fetch: fetchFriends,
  } = useService(`/users/${id}/friends`);

  useEffect(() => {
    fetchFriends();
  }, []);

  if (loading) {
    // show loading indicator
  }

  if (error) {
    // show error message component
  }

  // show the acutal friend list
};
You will notice that inside a component we have to deal with
different states, even we extract custom Hook to reduce the noise in a
component, we still need to pay good attention to handling
loading and error inside a component. These
boilerplate code can be cumbersome and distracting, often cluttering the
readability of our codebase.
If we think of declarative API, like how we build our UI with JSX, the
code can be written in the following manner that allows you to focus on
what the component is doing – not how to do it:
<WhenError fallback={<ErrorMessage />}>
  <WhenInProgress fallback={<Loading />}>
    <Friends />
  </WhenInProgress>
</WhenError>
In the above code snippet, the intention is simple and clear: when an
error occurs, ErrorMessage is displayed. While the operation is in
progress, Loading is shown. Once the operation completes without errors,
the Friends component is rendered.
And the code snippet above is pretty similiar to what already be
implemented in a few libraries (including React and Vue.js). For example,
the new Suspense in React allows developers to more effectively manage
asynchronous operations within their components, improving the handling of
loading states, error states, and the orchestration of concurrent
tasks.
Implementing Fallback Markup in React with Suspense
Suspense in React is a mechanism for efficiently handling
asynchronous operations, such as data fetching or resource loading, in a
declarative manner. By wrapping components in a Suspense boundary,
developers can specify fallback content to display while waiting for the
component’s data dependencies to be fulfilled, streamlining the user
experience during loading states.
While with the Suspense API, in the Friends you describe what you
want to get and then render:
import useSWR from "swr";
import { get } from "../utils.ts";

function Friends({ id }: { id: string }) {
  const { data: users } = useSWR("/api/profile", () => get<User[]>(`/users/${id}/friends`), {
    suspense: true,
  });

  return (
    <div>
      <h2>Friends</h2>
      <div>
        {friends.map((user) => (
          <Friend user={user} key={user.id} />
        ))}
      </div>
    </div>
  );
}
And declaratively when you use the Friends, you use
Suspense boundary to wrap around the Friends
component:
<Suspense fallback={<FriendsSkeleton />}>
  <Friends id={id} />
</Suspense>
Suspense manages the asynchronous loading of the
Friends component, showing a FriendsSkeleton
placeholder until the component’s data dependencies are
resolved. This setup ensures that the user interface remains responsive
and informative during data fetching, improving the overall user
experience.
Use the pattern in Vue.js
It’s worth noting that Vue.js is also exploring a similar
experimental pattern, where you can employ Fallback Markup using:
<Suspense>
  <template #default>
    <AsyncComponent />
  </template>
  <template #fallback>
    Loading...
  </template>
</Suspense>
Upon the first render, <Suspense> attempts to render
its default content behind the scenes. Should it encounter any
asynchronous dependencies during this phase, it transitions into a
pending state, where the fallback content is displayed instead. Once all
the asynchronous dependencies are successfully loaded,
<Suspense> moves to a resolved state, and the content
initially intended for display (the default slot content) is
rendered.
Deciding Placement for the Loading Component
You may wonder where to place the FriendsSkeleton
component and who should manage it. Typically, without using Fallback
Markup, this decision is straightforward and handled directly within the
component that manages the data fetching:
const Friends = ({ id }: { id: string }) => {
  // Data fetching logic here...

  if (loading) {
    // Display loading indicator
  }

  if (error) {
    // Display error message component
  }

  // Render the actual friend list
};
In this setup, the logic for displaying loading indicators or error
messages is naturally situated within the Friends component. However,
adopting Fallback Markup shifts this responsibility to the
component’s consumer:
<Suspense fallback={<FriendsSkeleton />}>
  <Friends id={id} />
</Suspense>
In real-world applications, the optimal approach to handling loading
experiences depends significantly on the desired user interaction and
the structure of the application. For instance, a hierarchical loading
approach where a parent component ceases to show a loading indicator
while its children components continue can disrupt the user experience.
Thus, it’s crucial to carefully consider at what level within the
component hierarchy the loading indicators or skeleton placeholders
should be displayed.
Think of Friends and FriendsSkeleton as two
distinct component states—one representing the presence of data, and the
other, the absence. This concept is somewhat analogous to using a Speical Case pattern in object-oriented
programming, where FriendsSkeleton serves as the ‘null’
state handling for the Friends component.
The key is to determine the granularity with which you want to
display loading indicators and to maintain consistency in these
decisions across your application. Doing so helps achieve a smoother and
more predictable user experience.
When to use it
Using Fallback Markup in your UI simplifies code by enhancing its readability
and maintainability. This pattern is particularly effective when utilizing
standard components for various states such as loading, errors, skeletons, and
empty views across your application. It reduces redundancy and cleans up
boilerplate code, allowing components to focus solely on rendering and
functionality.
Fallback Markup, such as React’s Suspense, standardizes the handling of
asynchronous loading, ensuring a consistent user experience. It also improves
application performance by optimizing resource loading and rendering, which is
especially beneficial in complex applications with deep component trees.
However, the effectiveness of Fallback Markup depends on the capabilities of
the framework you are using. For example, React’s implementation of Suspense for
data fetching still requires third-party libraries, and Vue’s support for
similar features is experimental. Moreover, while Fallback Markup can reduce
complexity in managing state across components, it may introduce overhead in
simpler applications where managing state directly within components could
suffice. Additionally, this pattern may limit detailed control over loading and
error states—situations where different error types need distinct handling might
not be as easily managed with a generic fallback approach.
Introducing UserDetailCard component
Let’s say we need a feature that when users hover on top of a Friend,
we show a popup so they can see more details about that user.
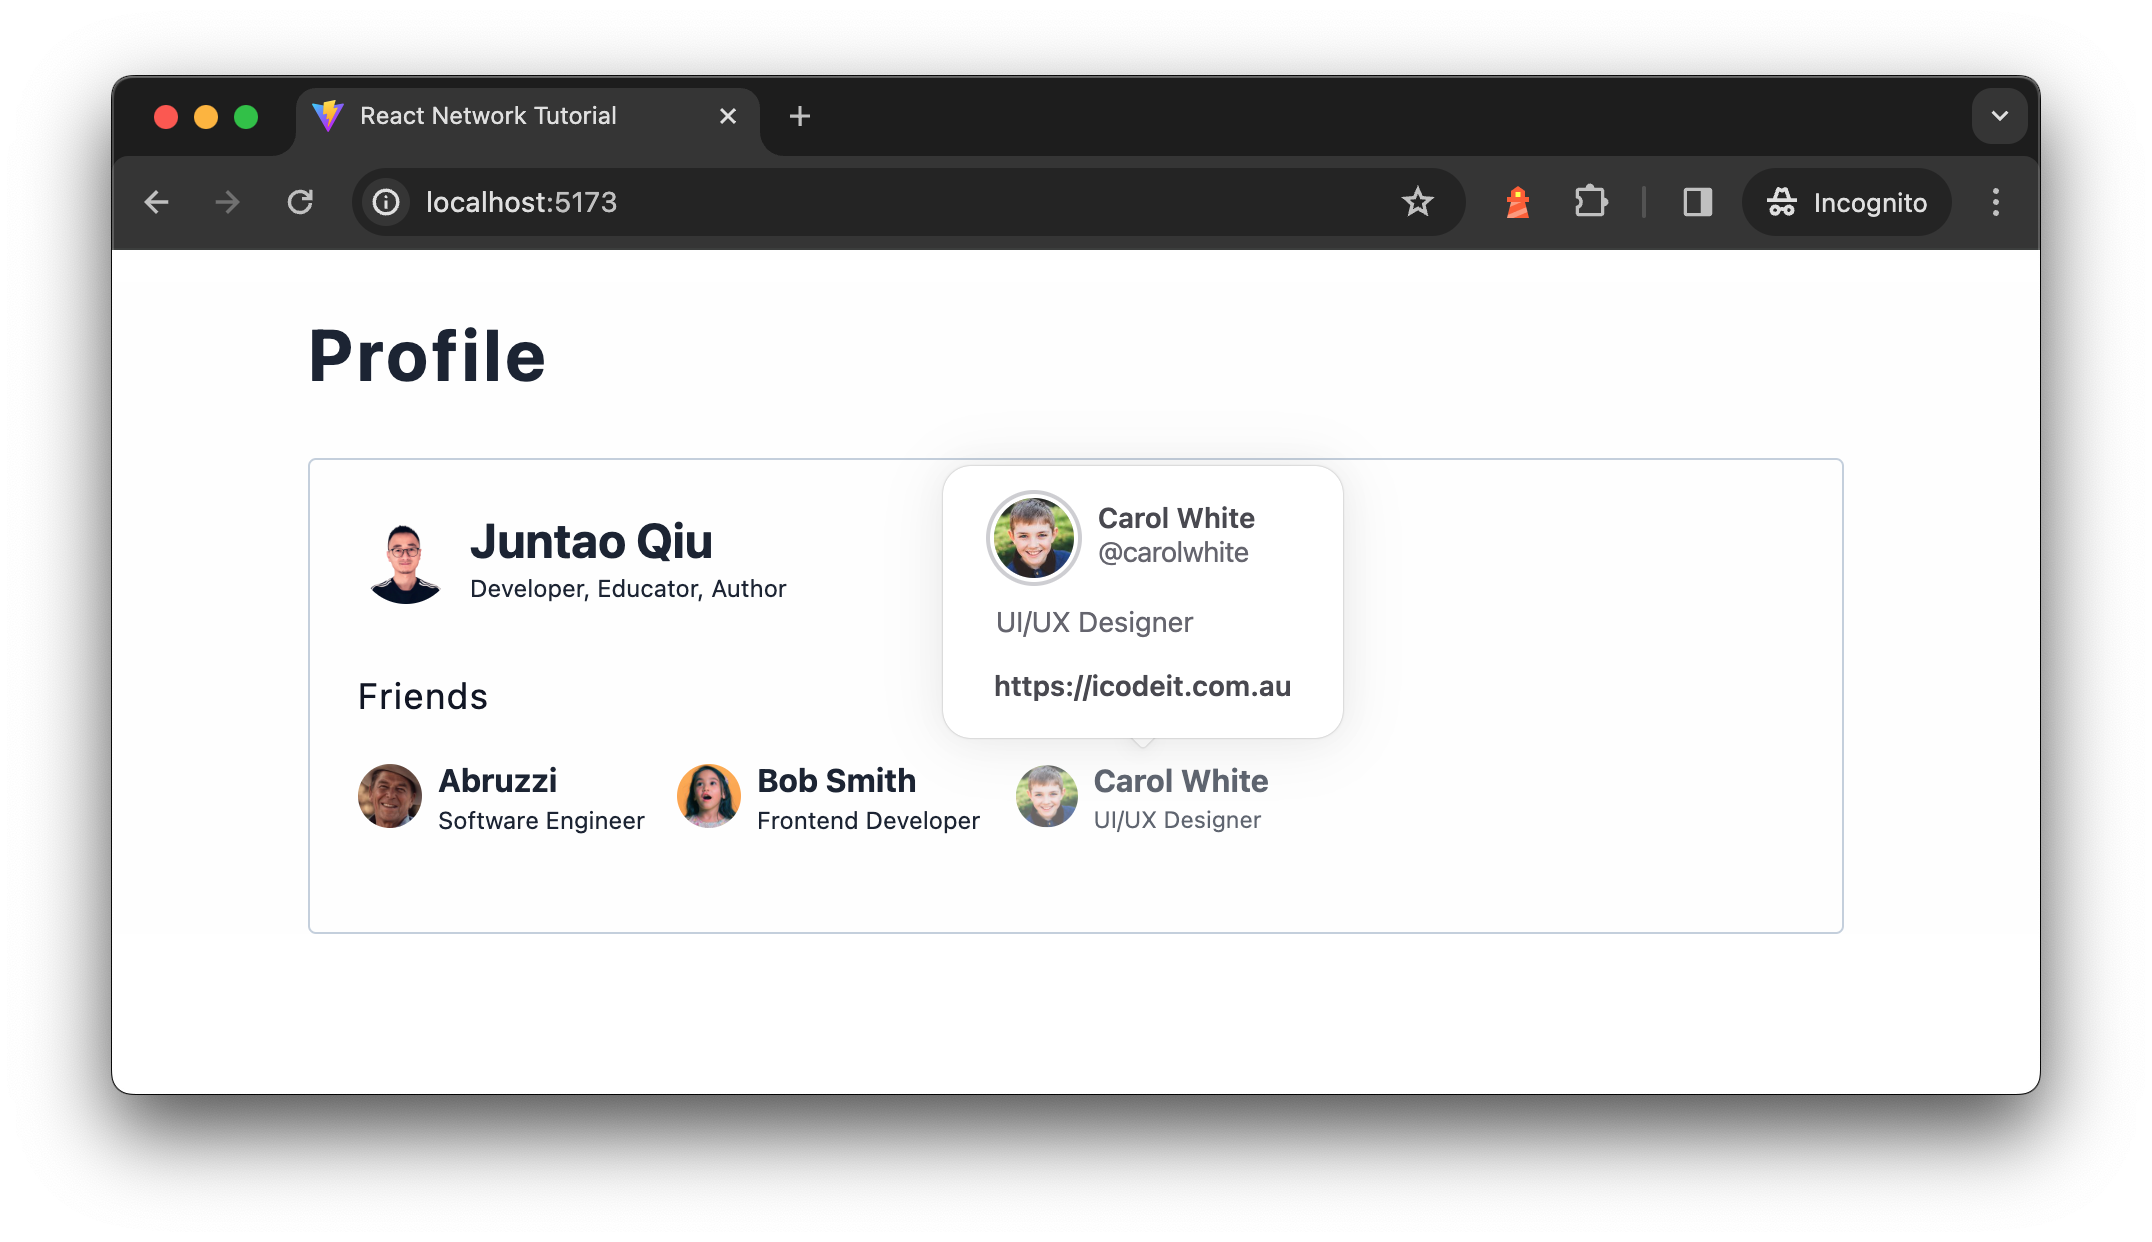
Figure 11: Showing user detail
card component when hover
When the popup shows up, we need to send another service call to get
the user details (like their homepage and number of connections, etc.). We
will need to update the Friend component ((the one we use to
render each item in the Friends list) ) to something like the
following.
import { Popover, PopoverContent, PopoverTrigger } from "@nextui-org/react";
import { UserBrief } from "./user.tsx";

import UserDetailCard from "./user-detail-card.tsx";

export const Friend = ({ user }: { user: User }) => {
  return (
    <Popover placement="bottom" showArrow offset={10}>
      <PopoverTrigger>
        <button>
          <UserBrief user={user} />
        </button>
      </PopoverTrigger>
      <PopoverContent>
        <UserDetailCard id={user.id} />
      </PopoverContent>
    </Popover>
  );
};
The UserDetailCard, is pretty similar to the
Profile component, it sends a request to load data and then
renders the result once it gets the response.
export function UserDetailCard({ id }: { id: string }) {
  const { loading, error, detail } = useUserDetail(id);

  if (loading || !detail) {
    return <div>Loading...</div>;
  }

  return (
    <div>
    {/* render the user detail*/}
    </div>
  );
}
We’re using Popover and the supporting components from
nextui, which provides a lot of beautiful and out-of-box
components for building modern UI. The only problem here, however, is that
the package itself is relatively big, also not everyone uses the feature
(hover and show details), so loading that extra large package for everyone
isn’t ideal – it would be better to load the UserDetailCard
on demand – whenever it’s required.
Figure 12: Component structure with
UserDetailCard
Code Splitting
Divide code into separate modules and dynamically load them as
needed.
Code Splitting addresses the issue of large bundle sizes in web
applications by dividing the bundle into smaller chunks that are loaded as
needed, rather than all at once. This improves initial load time and
performance, especially important for large applications or those with
many routes.
This optimization is typically carried out at build time, where complex
or sizable modules are segregated into distinct bundles. These are then
dynamically loaded, either in response to user interactions or
preemptively, in a manner that does not hinder the critical rendering path
of the application.
Leveraging the Dynamic Import Operator
The dynamic import operator in JavaScript streamlines the process of
loading modules. Though it may resemble a function call in your code,
such as import("./user-detail-card.tsx"), it’s important to
recognize that import is actually a keyword, not a
function. This operator enables the asynchronous and dynamic loading of
JavaScript modules.
With dynamic import, you can load a module on demand. For example, we
only load a module when a button is clicked:
button.addEventListener("click", (e) => {

  import("/modules/some-useful-module.js")
    .then((module) => {
      module.doSomethingInteresting();
    })
    .catch(error => {
      console.error("Failed to load the module:", error);
    });
});
The module is not loaded during the initial page load. Instead, the
import() call is placed inside an event listener so it only
be loaded when, and if, the user interacts with that button.
You can use dynamic import operator in React and libraries like
Vue.js. React simplifies the code splitting and lazy load through the
React.lazy and Suspense APIs. By wrapping the
import statement with React.lazy, and subsequently wrapping
the component, for instance, UserDetailCard, with
Suspense, React defers the component rendering until the
required module is loaded. During this loading phase, a fallback UI is
presented, seamlessly transitioning to the actual component upon load
completion.
import React, { Suspense } from "react";
import { Popover, PopoverContent, PopoverTrigger } from "@nextui-org/react";
import { UserBrief } from "./user.tsx";

const UserDetailCard = React.lazy(() => import("./user-detail-card.tsx"));

export const Friend = ({ user }: { user: User }) => {
  return (
    <Popover placement="bottom" showArrow offset={10}>
      <PopoverTrigger>
        <button>
          <UserBrief user={user} />
        </button>
      </PopoverTrigger>
      <PopoverContent>
        <Suspense fallback={<div>Loading...</div>}>
          <UserDetailCard id={user.id} />
        </Suspense>
      </PopoverContent>
    </Popover>
  );
};
This snippet defines a Friend component displaying user
details within a popover from Next UI, which appears upon interaction.
It leverages React.lazy for code splitting, loading the
UserDetailCard component only when needed. This
lazy-loading, combined with Suspense, enhances performance
by splitting the bundle and showing a fallback during the load.
If we visualize the above code, it renders in the following
sequence.
Figure 13: Dynamic load component
when needed
Note that when the user hovers and we download
the JavaScript bundle, there will be some extra time for the browser to
parse the JavaScript. Once that part of the work is done, we can get the
user details by calling /users/<id>/details API.
Eventually, we can use that data to render the content of the popup
UserDetailCard.
When to use it
Splitting out extra bundles and loading them on demand is a viable
strategy, but it’s crucial to consider how you implement it. Requesting
and processing an additional bundle can indeed save bandwidth and lets
users only load what they need. However, this approach might also slow
down the user experience in certain scenarios. For example, if a user
hovers over a button that triggers a bundle load, it could take a few
seconds to load, parse, and execute the JavaScript necessary for
rendering. Even though this delay occurs only during the first
interaction, it might not provide the ideal experience.
To improve perceived performance, effectively using React Suspense to
display a skeleton or another loading indicator can help make the
loading process seem quicker. Additionally, if the separate bundle is
not significantly large, integrating it into the main bundle could be a
more straightforward and cost-effective approach. This way, when a user
hovers over components like UserBrief, the response can be
immediate, enhancing the user interaction without the need for separate
loading steps.
Lazy load in other frontend libraries
Again, this pattern is widely adopted in other frontend libraries as
well. For example, you can use defineAsyncComponent in Vue.js to
achieve the samiliar result – only load a component when you need it to
render:
<template>
  <Popover placement="bottom" show-arrow offset="10">
  <!-- the rest of the template -->
  </Popover>
</template>

<script>
import { defineAsyncComponent } from 'vue';
import Popover from 'path-to-popover-component';
import UserBrief from './UserBrief.vue';

const UserDetailCard = defineAsyncComponent(() => import('./UserDetailCard.vue'));

// rendering logic
</script>
The function defineAsyncComponent defines an async
component which is lazy loaded only when it is rendered just like the
React.lazy.
As you might have already seen the noticed, we are running into a Request Waterfall here again: we load the
JavaScript bundle first, and then when it execute it sequentially call
user details API, which makes some extra waiting time. We could request
the JavaScript bundle and the network request parallely. Meaning,
whenever a Friend component is hovered, we can trigger a
network request (for the data to render the user details) and cache the
result, so that by the time when the bundle is downloaded, we can use
the data to render the component immediately.
Prefetching
Prefetch data before it may be needed to reduce latency if it is.
Prefetching involves loading resources or data ahead of their actual
need, aiming to decrease wait times during subsequent operations. This
technique is particularly beneficial in scenarios where user actions can
be predicted, such as navigating to a different page or displaying a modal
dialog that requires remote data.
In practice, prefetching can be
implemented using the native HTML <link> tag with a
rel="preload" attribute, or programmatically via the
fetch API to load data or resources in advance. For data that
is predetermined, the simplest approach is to use the
<link> tag within the HTML <head>:
<!doctype html>
<html lang="en">
  <head>
    <link rel="preload" href="https://martinfowler.com/bootstrap.js" as="script">

    <link rel="preload" href="https://martinfowler.com/users/u1" as="fetch" crossorigin="anonymous">
    <link rel="preload" href="https://martinfowler.com/users/u1/friends" as="fetch" crossorigin="anonymous">

    <script type="module" src="https://martinfowler.com/app.js"></script>
  </head>
  <body>
    <div id="root"></div>
  </body>
</html>
With this setup, the requests for bootstrap.js and user API are sent
as soon as the HTML is parsed, significantly earlier than when other
scripts are processed. The browser will then cache the data, ensuring it
is ready when your application initializes.
However, it’s often not possible to know the precise URLs ahead of
time, requiring a more dynamic approach to prefetching. This is typically
managed programmatically, often through event handlers that trigger
prefetching based on user interactions or other conditions.
For example, attaching a mouseover event listener to a button can
trigger the prefetching of data. This method allows the data to be fetched
and stored, perhaps in a local state or cache, ready for immediate use
when the actual component or content requiring the data is interacted with
or rendered. This proactive loading minimizes latency and enhances the
user experience by having data ready ahead of time.
document.getElementById('button').addEventListener('mouseover', () => {
  fetch(`/user/${user.id}/details`)
    .then(response => response.json())
    .then(data => {
      sessionStorage.setItem('userDetails', JSON.stringify(data));
    })
    .catch(error => console.error(error));
});
And in the place that needs the data to render, it reads from
sessionStorage when available, otherwise showing a loading indicator.
Normally the user experiense would be much faster.
Implementing Prefetching in React
For example, we can use preload from the
swr package (the function name is a bit misleading, but it
is performing a prefetch here), and then register an
onMouseEnter event to the trigger component of
Popover,
import { preload } from "swr";
import { getUserDetail } from "../api.ts";

const UserDetailCard = React.lazy(() => import("./user-detail-card.tsx"));

export const Friend = ({ user }: { user: User }) => {
  const handleMouseEnter = () => {
    preload(`/user/${user.id}/details`, () => getUserDetail(user.id));
  };

  return (
    <Popover placement="bottom" showArrow offset={10}>
      <PopoverTrigger>
        <button onMouseEnter={handleMouseEnter}>
          <UserBrief user={user} />
        </button>
      </PopoverTrigger>
      <PopoverContent>
        <Suspense fallback={<div>Loading...</div>}>
          <UserDetailCard id={user.id} />
        </Suspense>
      </PopoverContent>
    </Popover>
  );
};
That way, the popup itself can have much less time to render, which
brings a better user experience.
Figure 14: Dynamic load with prefetch
in parallel
So when a user hovers on a Friend, we download the
corresponding JavaScript bundle as well as download the data needed to
render the UserDetailCard, and by the time UserDetailCard
renders, it sees the existing data and renders immediately.
Figure 15: Component structure with
dynamic load
As the data fetching and loading is shifted to Friend
component, and for UserDetailCard, it reads from the local
cache maintained by swr.
import useSWR from "swr";

export function UserDetailCard({ id }: { id: string }) {
  const { data: detail, isLoading: loading } = useSWR(
    `/user/${id}/details`,
    () => getUserDetail(id)
  );

  if (loading || !detail) {
    return <div>Loading...</div>;
  }

  return (
    <div>
    {/* render the user detail*/}
    </div>
  );
}
This component uses the useSWR hook for data fetching,
making the UserDetailCard dynamically load user details
based on the given id. useSWR offers efficient
data fetching with caching, revalidation, and automatic error handling.
The component displays a loading state until the data is fetched. Once
the data is available, it proceeds to render the user details.
In summary, we’ve already explored critical data fetching strategies:
Asynchronous State Handler , Parallel Data Fetching ,
Fallback Markup , Code Splitting and Prefetching . Elevating requests for parallel execution
enhances efficiency, though it’s not always straightforward, especially
when dealing with components developed by different teams without full
visibility. Code splitting allows for the dynamic loading of
non-critical resources based on user interaction, like clicks or hovers,
utilizing prefetching to parallelize resource loading.
When to use it
Consider applying prefetching when you notice that the initial load time of
your application is becoming slow, or there are many features that aren’t
immediately necessary on the initial screen but could be needed shortly after.
Prefetching is particularly useful for resources that are triggered by user
interactions, such as mouse-overs or clicks. While the browser is busy fetching
other resources, such as JavaScript bundles or assets, prefetching can load
additional data in advance, thus preparing for when the user actually needs to
see the content. By loading resources during idle times, prefetching utilizes the
network more efficiently, spreading the load over time rather than causing spikes
in demand.
It’s wise to follow a general guideline: don’t implement complex patterns like
prefetching until they are clearly needed. This might be the case if performance
issues become apparent, especially during initial loads, or if a significant
portion of your users access the app from mobile devices, which typically have
less bandwidth and slower JavaScript engines. Also, consider that there are other
performance optimization tactics such as caching at various levels, using CDNs
for static assets, and ensuring assets are compressed. These methods can enhance
performance with simpler configurations and without additional coding. The
effectiveness of prefetching relies on accurately predicting user actions.
Incorrect assumptions can lead to ineffective prefetching and even degrade the
user experience by delaying the loading of actually needed resources.
Choosing the right pattern
Selecting the appropriate pattern for data fetching and rendering in
web development is not one-size-fits-all. Often, multiple strategies are
combined to meet specific requirements. For example, you might need to
generate some content on the server side – using Server-Side Rendering
techniques – supplemented by client-side
Fetch-Then-Render for dynamic
content. Furthermore, non-essential sections can be split into separate
bundles for lazy loading, possibly with Prefetching triggered by user
actions, such as hover or click.
Consider the Jira issue page as an example. The top navigation and
sidebar are static, loading first to give users immediate context. Early
on, you’re presented with the issue’s title, description, and key details
like the Reporter and Assignee. For less immediate information, such as
the History section at an issue’s bottom, it loads only upon user
interaction, like clicking a tab. This utilizes lazy loading and data
fetching to efficiently manage resources and enhance user experience.
Figure 16: Using patterns together
Moreover, certain strategies require additional setup compared to
default, less optimized solutions. For instance, implementing Code Splitting requires bundler support. If your current bundler lacks this
capability, an upgrade may be required, which could be impractical for
older, less stable systems.
We’ve covered a wide range of patterns and how they apply to various
challenges. I realize there’s quite a bit to take in, from code examples
to diagrams. If you’re looking for a more guided approach, I’ve put
together a comprehensive tutorial on my
website, or if you only want to have a look at the working code, they are
all hosted in this github repo.
Conclusion
Data fetching is a nuanced aspect of development, yet mastering the
appropriate techniques can vastly enhance our applications. As we conclude
our journey through data fetching and content rendering strategies within
the context of React, it’s crucial to highlight our main insights:
- Asynchronous State Handler: Utilize custom hooks or composable APIs to
abstract data fetching and state management away from your components. This
pattern centralizes asynchronous logic, simplifying component design and
enhancing reusability across your application. - Fallback Markup: React’s enhanced Suspense model supports a more
declarative approach to fetching data asynchronously, streamlining your
codebase. - Parallel Data Fetching: Maximize efficiency by fetching data in
parallel, reducing wait times and boosting the responsiveness of your
application. - Code Splitting: Employ lazy loading for non-essential
components during the initial load, leveraging Suspense for graceful
handling of loading states and code splitting, thereby ensuring your
application remains performant. - Prefetching: By preemptively loading data based on predicted user
actions, you can achieve a smooth and fast user experience.
While these insights were framed within the React ecosystem, it’s
essential to recognize that these patterns are not confined to React
alone. They are broadly applicable and beneficial strategies that can—and
should—be adapted for use with other libraries and frameworks. By
thoughtfully implementing these approaches, developers can create
applications that are not just efficient and scalable, but also offer a
superior user experience through effective data fetching and content
rendering practices.
Contact Softscribble for your software Requirement
Contact Now
Related Posts